最近在準備 Bootcamp 畢業前的 Final Project,由於專案和訂餐平台有關,想說若使用者能透過地圖快速瀏覽營運中的餐廳,或能在訂單上看到地圖顯示領餐地點,可以增加使用者的體驗。由於之前還沒有碰過 Google Map API,更不用說在 Vue.js 當中使用,想說趁專案開始前,能嘗試自學一下,也看一下實作的可行性與成果。以下將筆記「從零接觸 Google Map API,在 Vue.js 中實作地圖、地標、地標訊息視窗」
使用 Google Map API 費用
目前使用 Google Map API 一個月會有免費 200 美金的額度可以使用,平台上提供的功能有很多種,這次會使用的是 Dynamic Maps — 透過 Maps JavaScript API 在網路應用程式中呈現地圖 — 一個月可以載 28,000 次,對於小專案或一般練習來說都很充足了!

建立專案
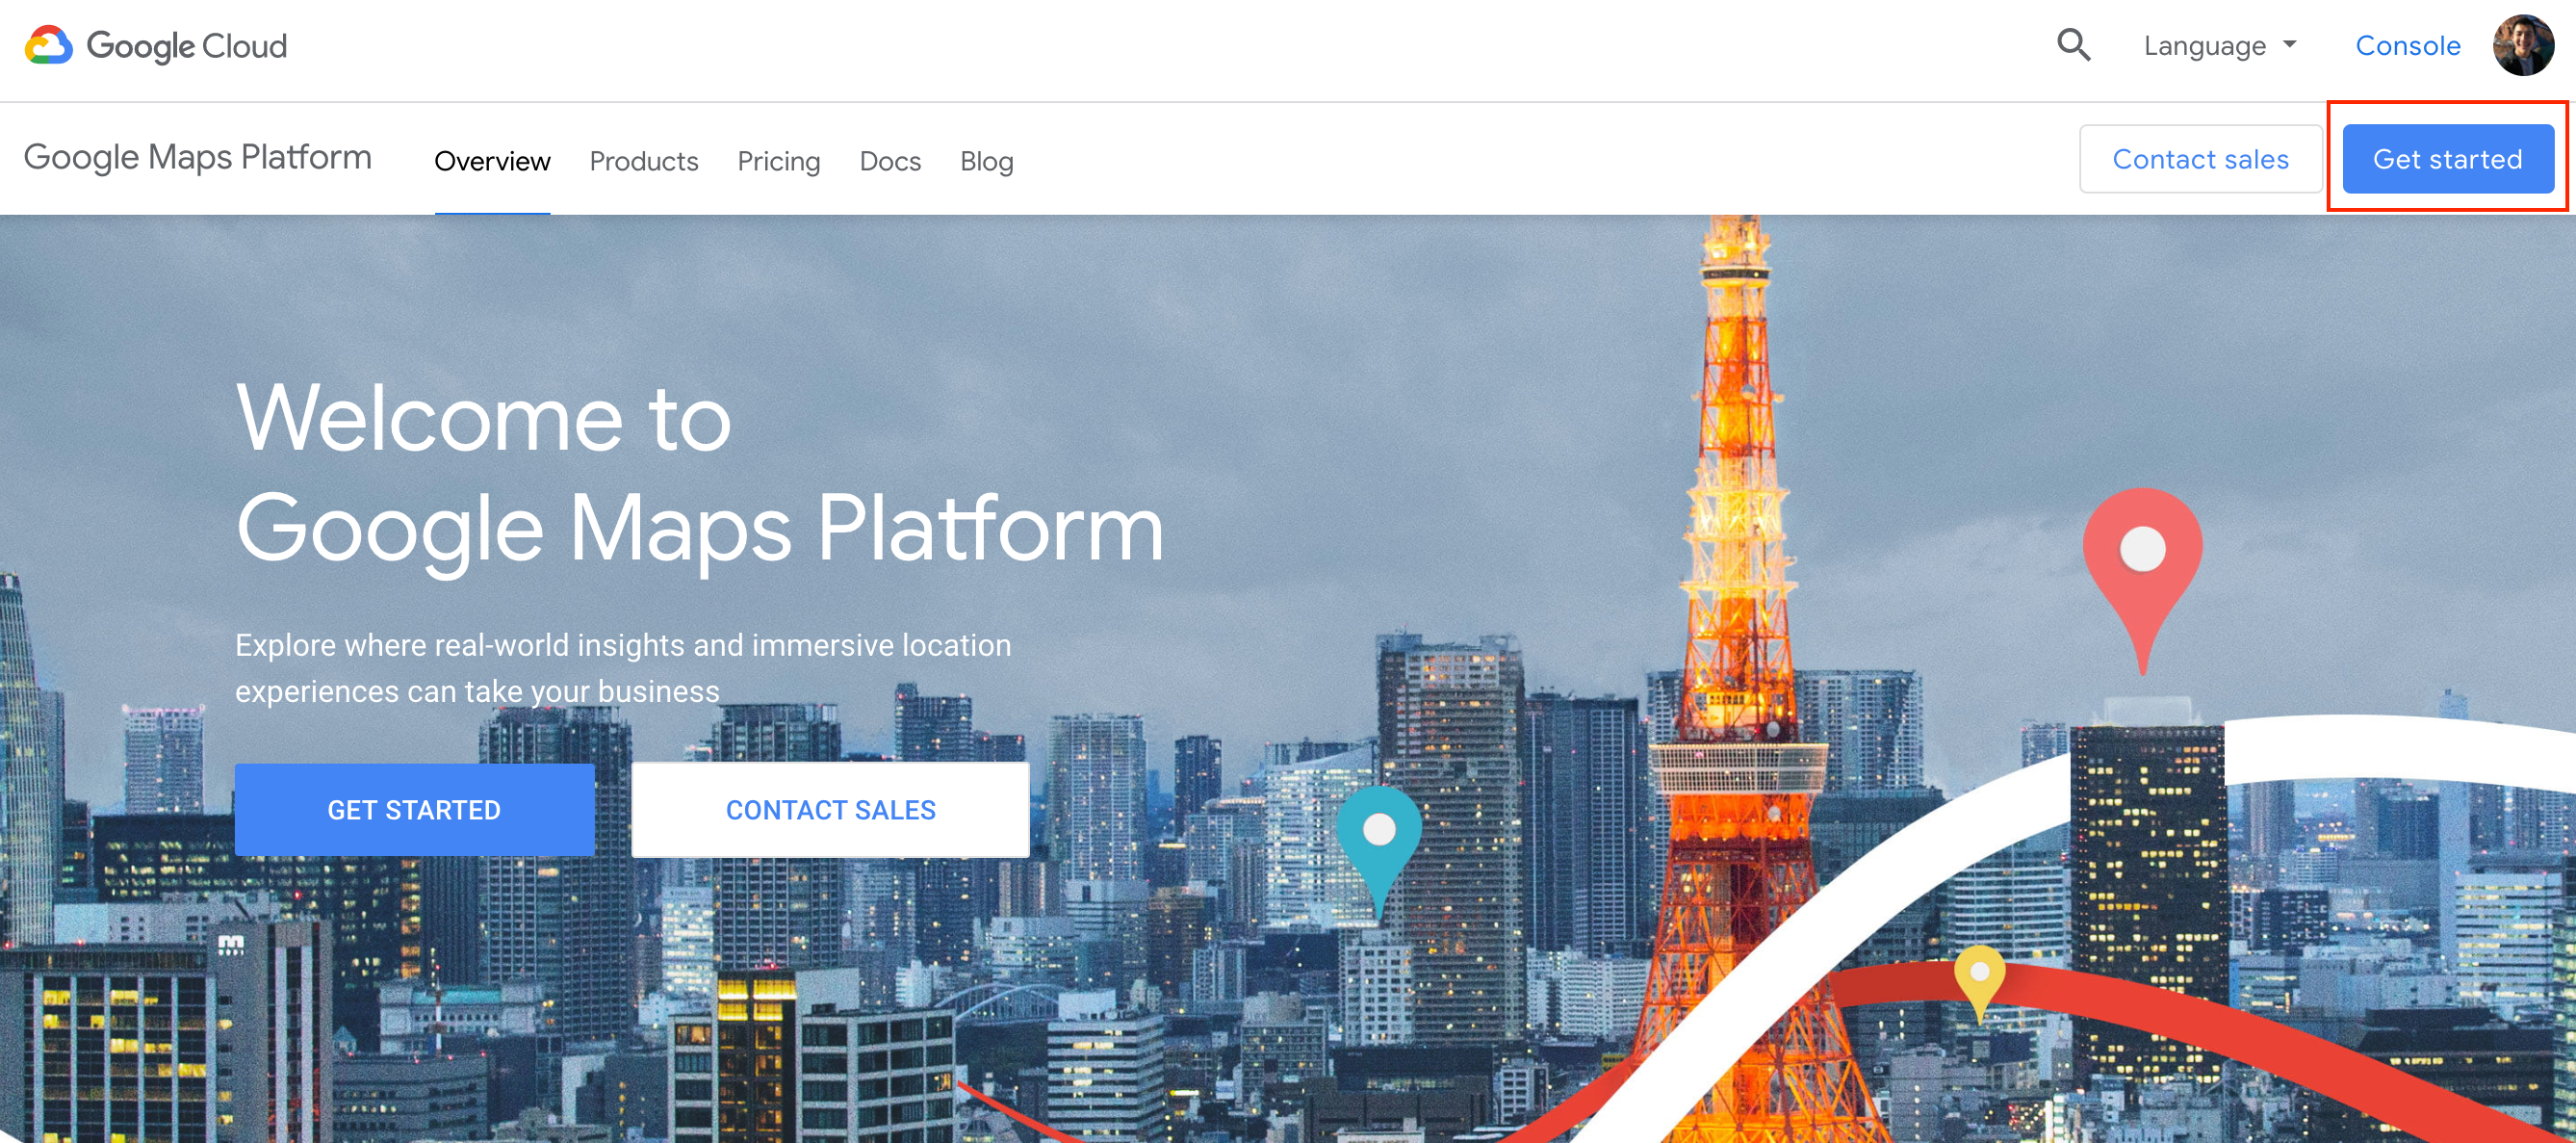
首先進入 Google Map Platform 點選「Get started」開始建立新專案:
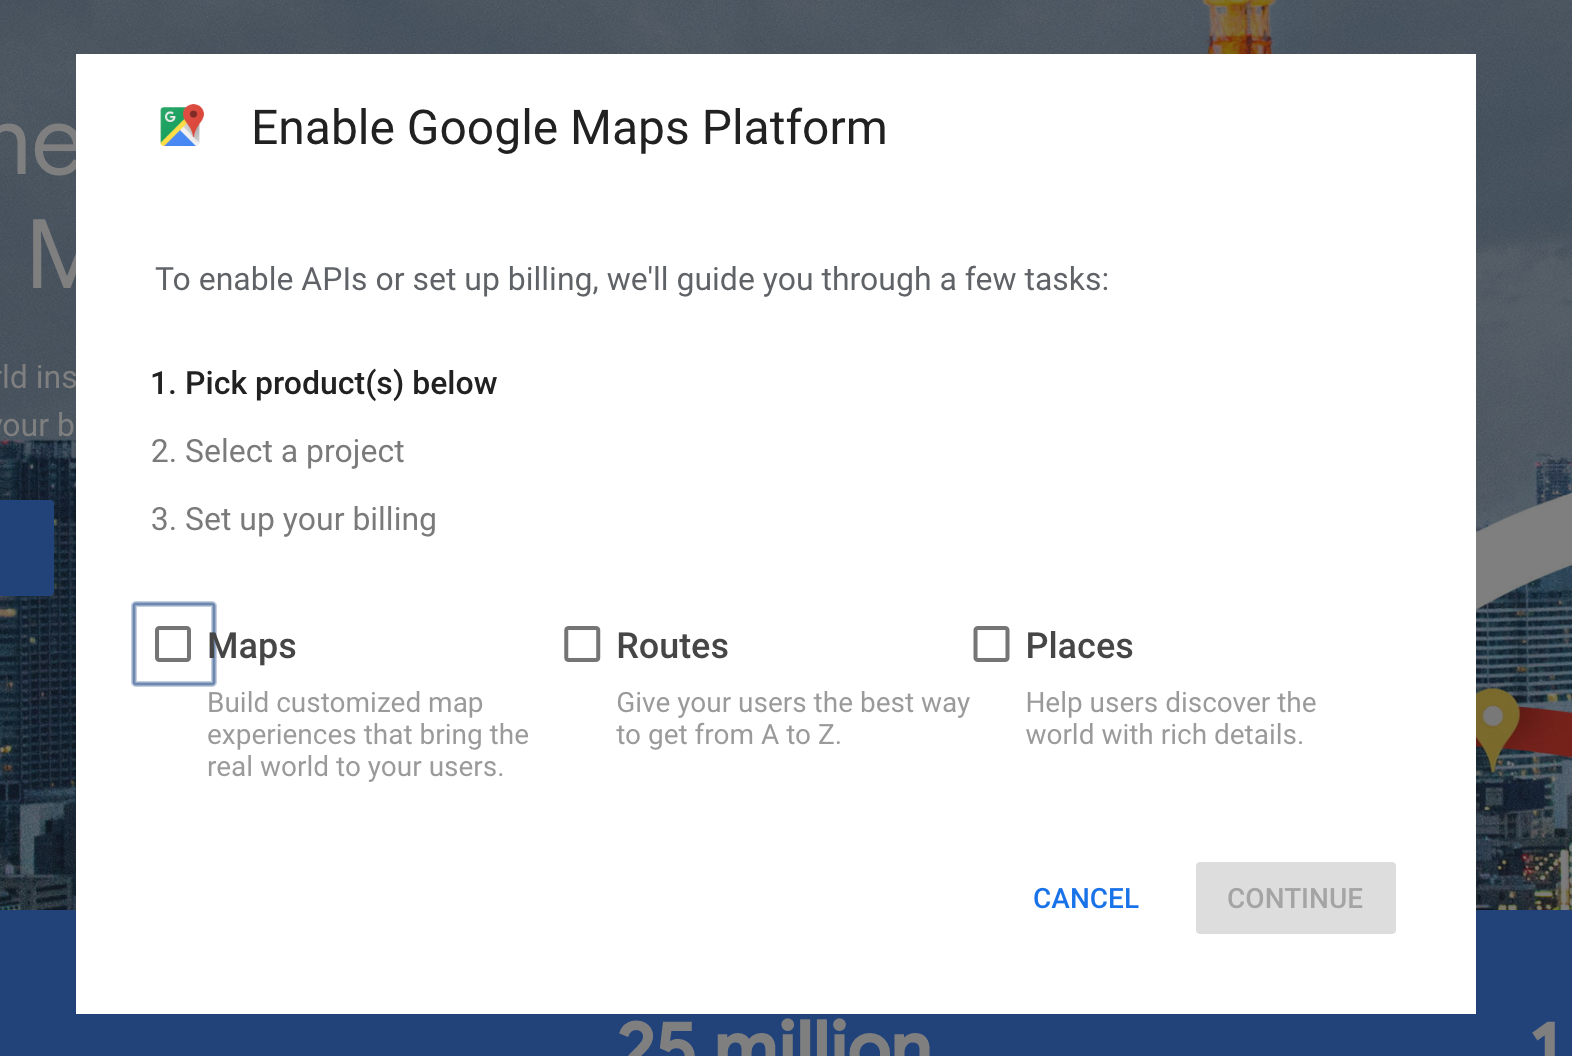
這次只會用到 Maps 的服務,因此點選「Maps」->「continue」:
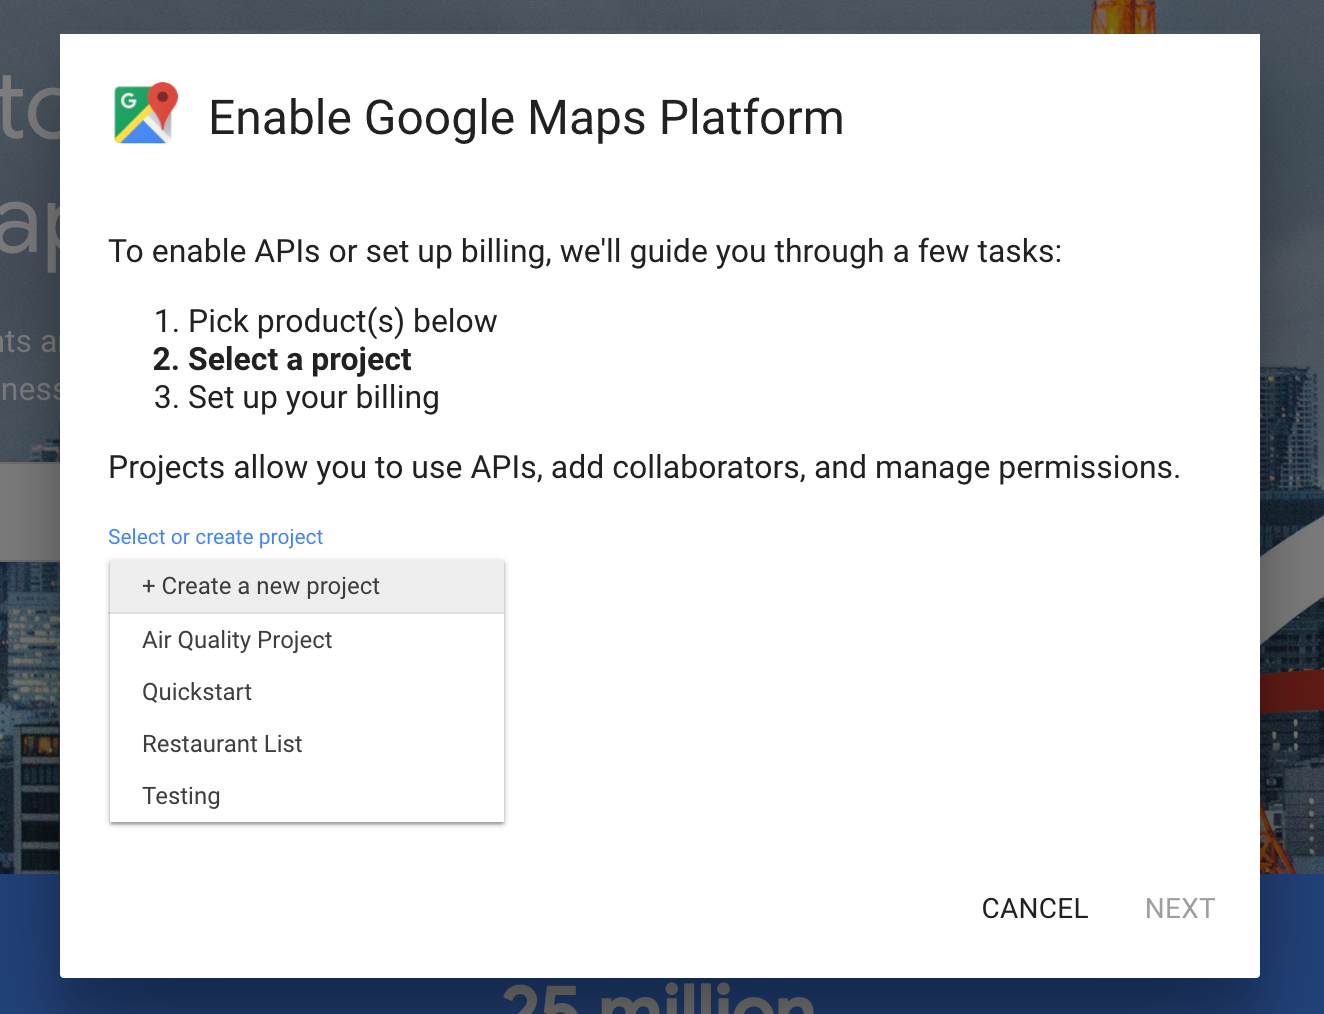
點選「Create a new project」建立新專案 -> 填寫專案名稱 -> 「Next」:
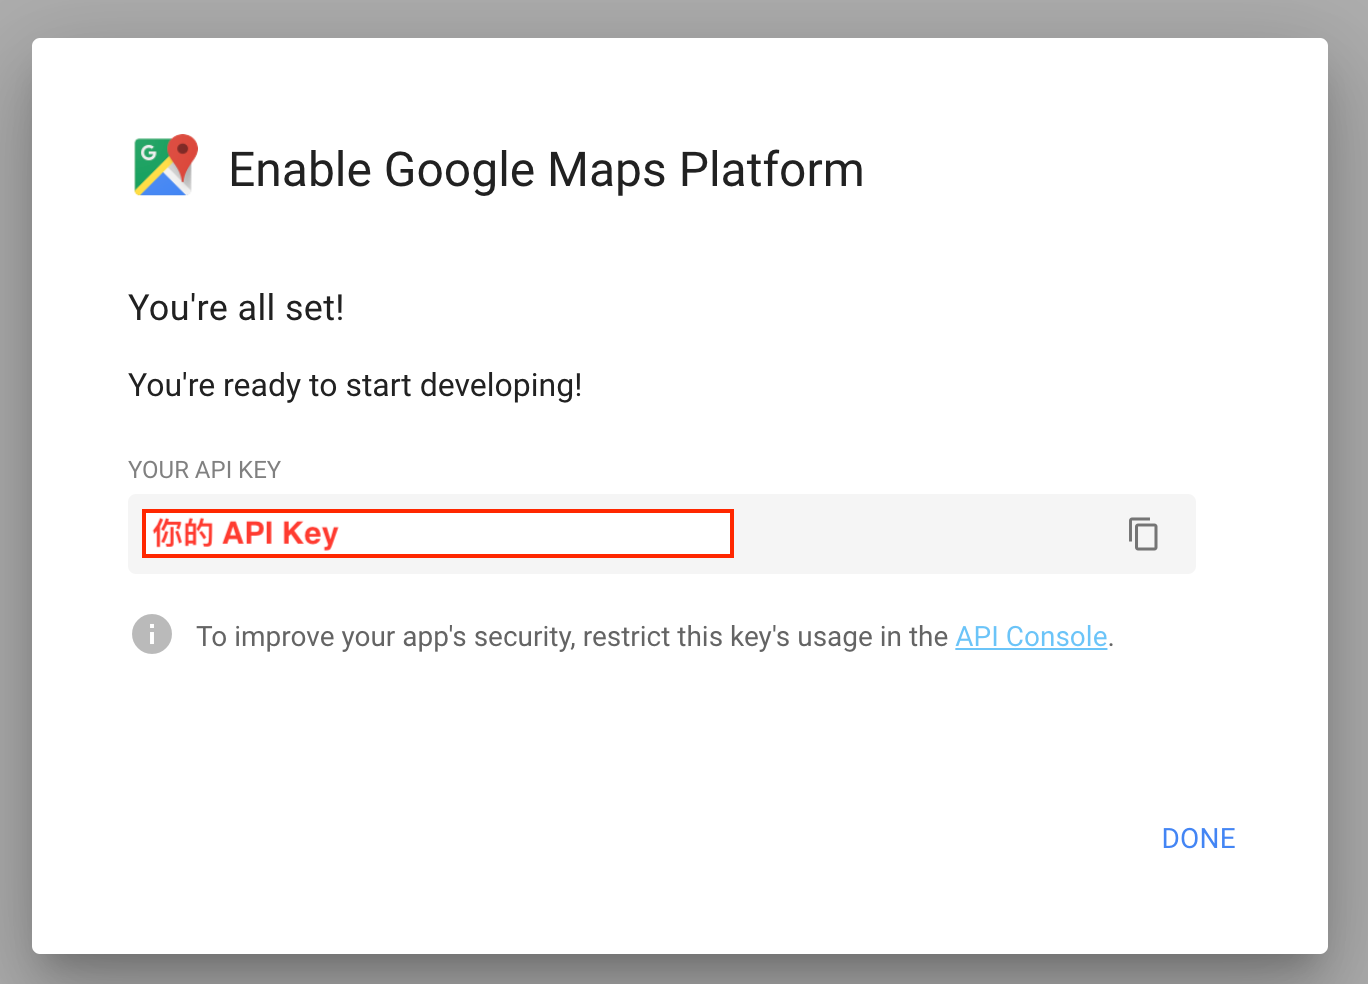
經過款項帳戶設定後,最終就會拿到一個專案的 API Key,可以先把這個 API Key 複製下來,等會兒在專案中會使用:
管理專案
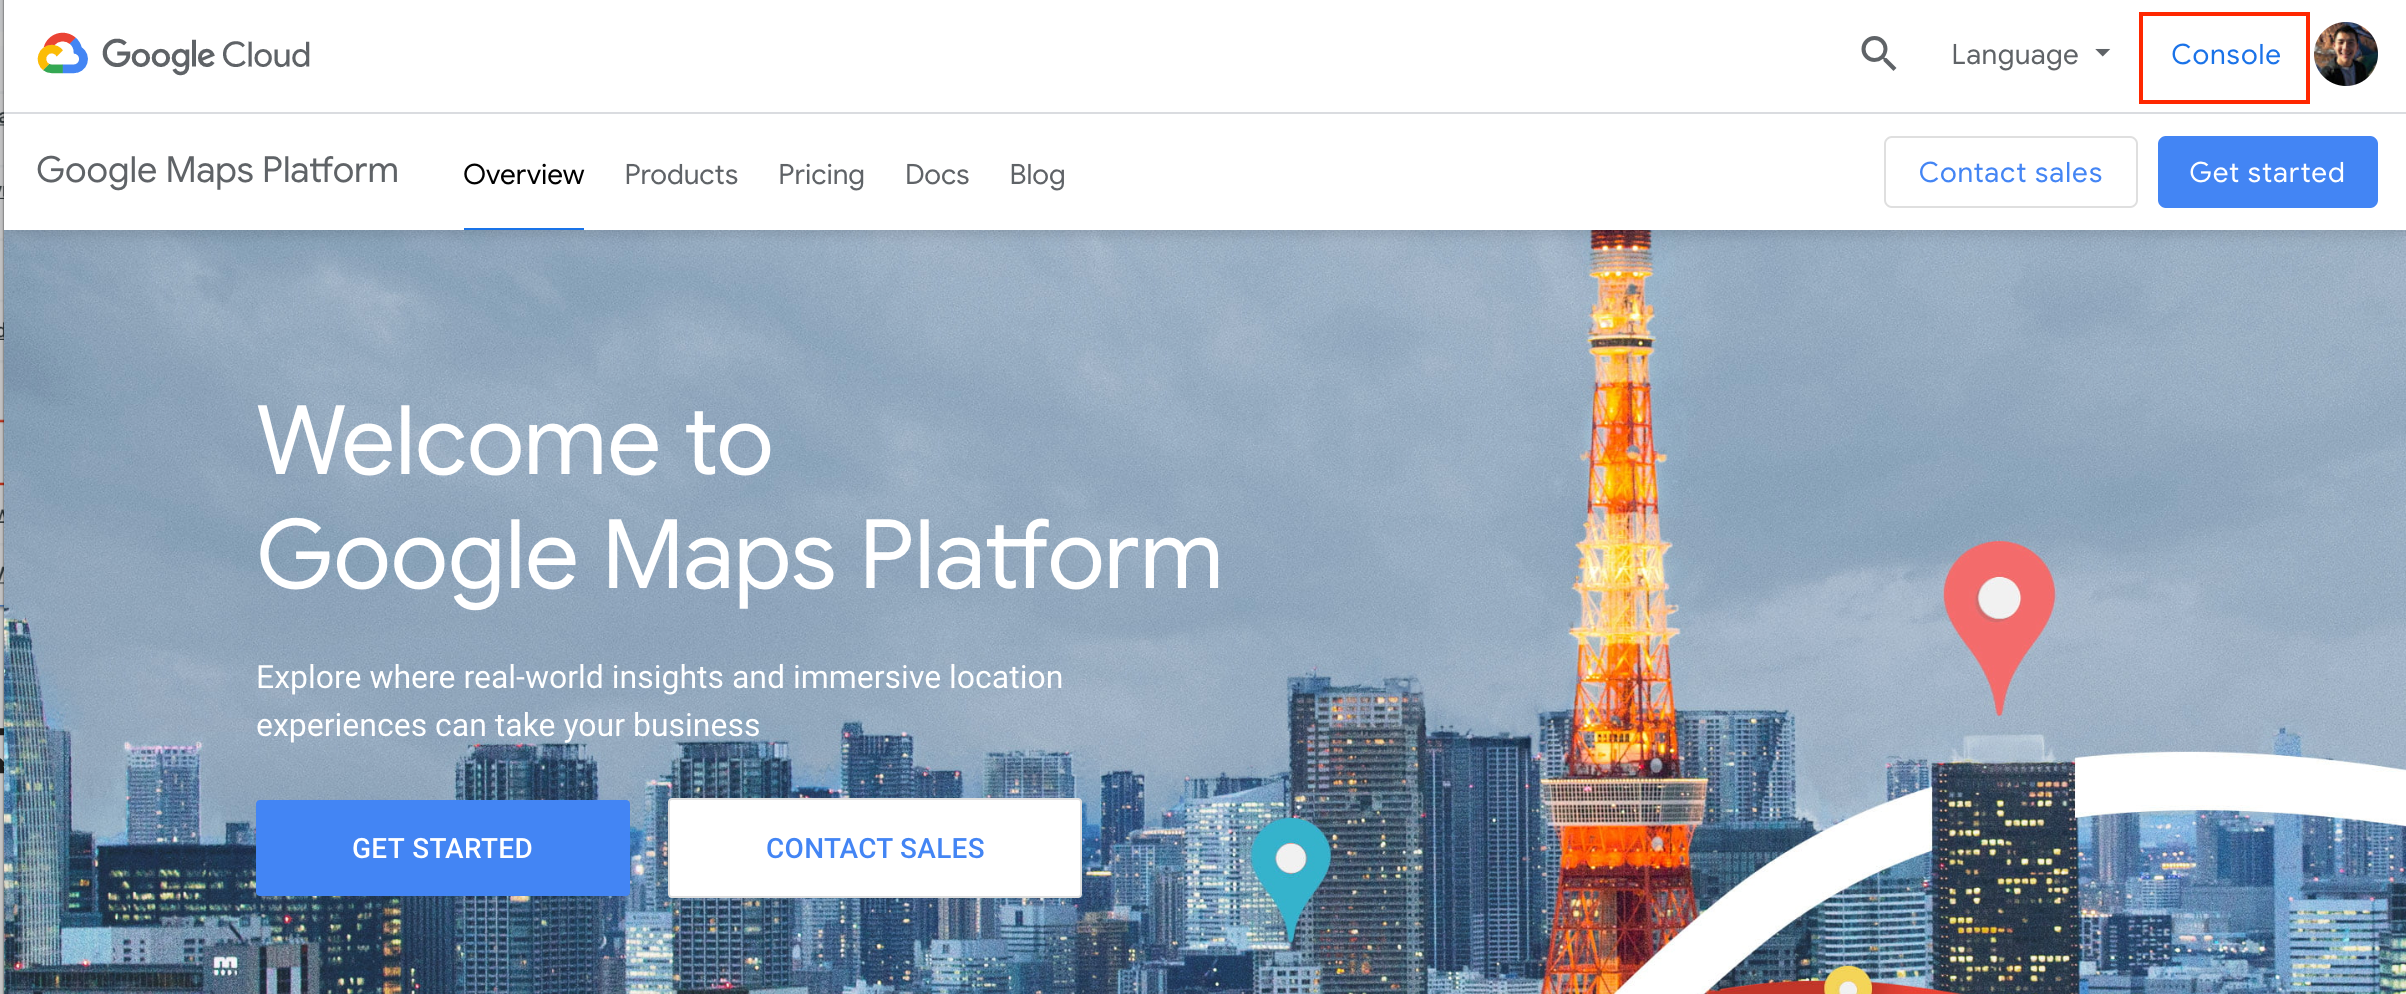
專案建置好後會進入專案後台,或你也可以透過 Google Map Platform 點選右上角的「Console」進入後台:
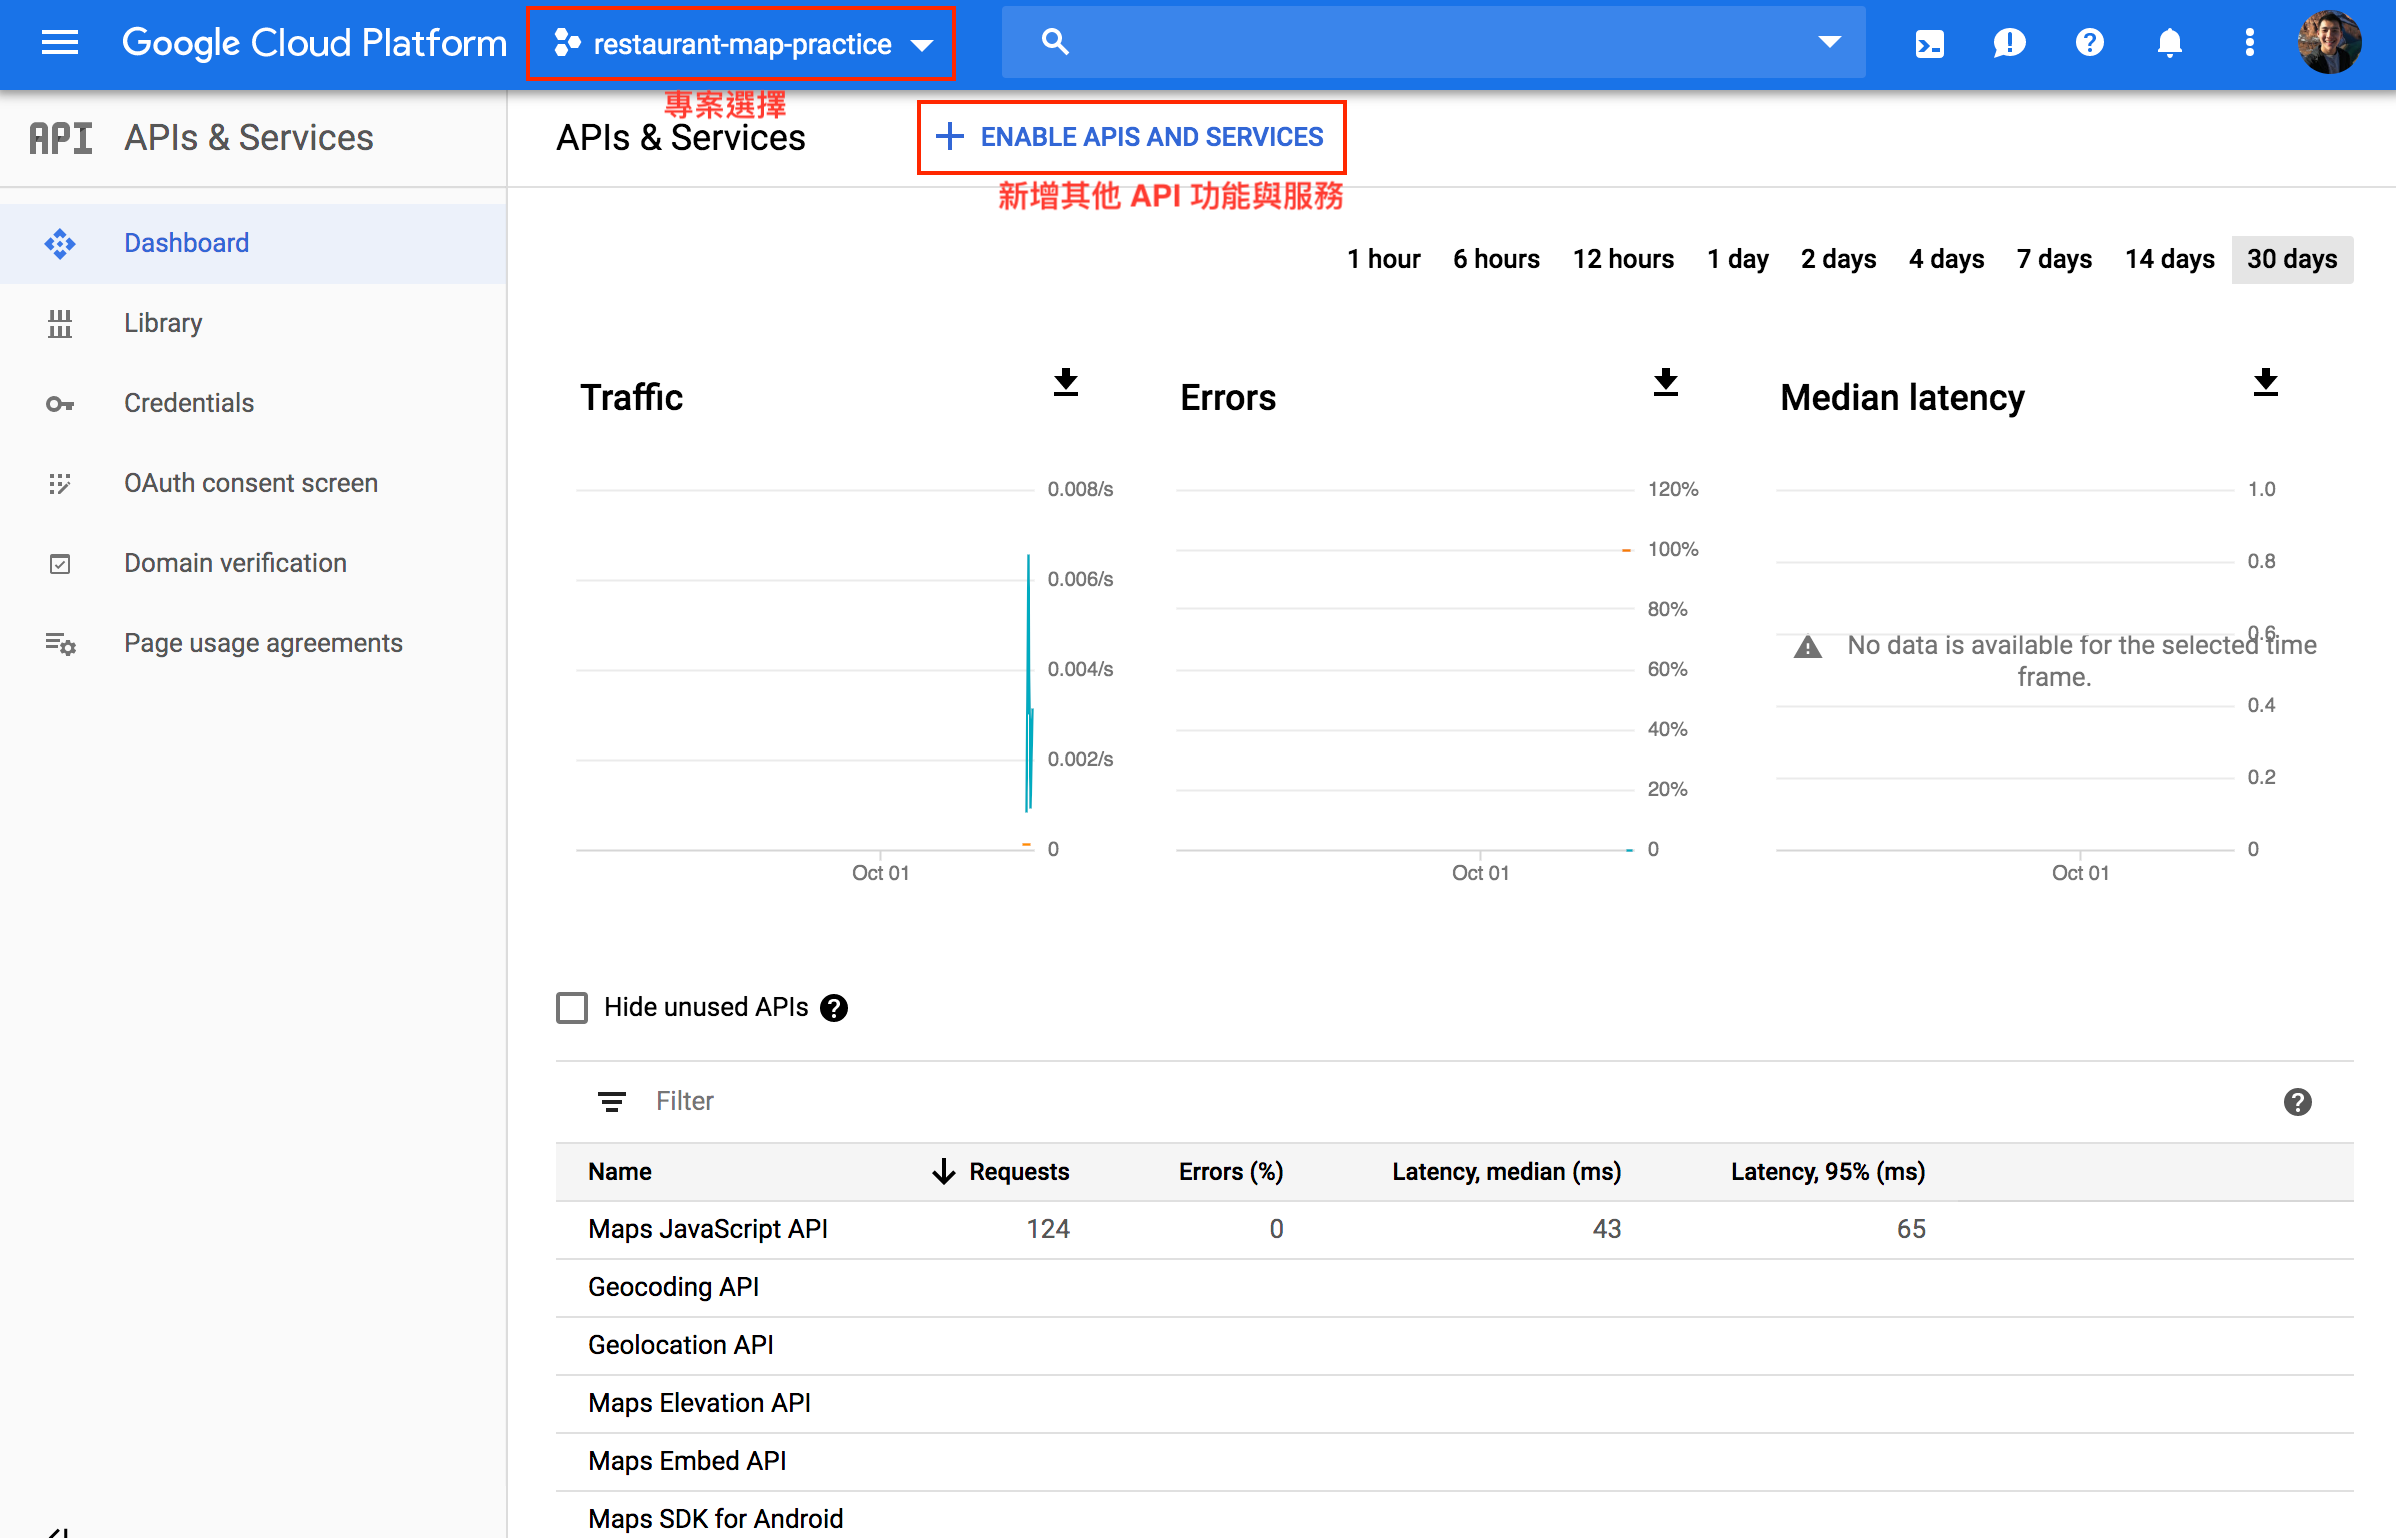
在專案後台可以在最上方切換不同專案及在此專案中新增其他 API 服務,下方則可以看到目前各能使用的狀態,例如已經載入次數等:
如果忘記專案的 API Key 或想更改其權限與設定時,可以點選左左側「Credentials」就能找到:

在 Vue 專案使用 Maps JavaScript API
這次將借助 Bootstrap 較快速地打造專案,讓我們能更專注在這次的的練習,因此在 index.html 檔案中,需要用 Bootstrap CDN 引入相關素材:
基本設定與使用
首先在 index.html 檔案中將 Maps JavaScript API 載入,當中的「YOUR_API_KEY」要替換成剛剛取得的專案 API Key
接著在 views 資料夾中建立一個 Restaurants.vue 的檔案,我們想要將地圖呈現出來,因此在 中合適的地方,加入
等下地圖就會呈現在這:
台北市營運餐廳
選擇好呈現的位置後,再來就是設定地圖的大小 — 在 Restaurants.vue 檔案裡的
中,給予地圖適當的寬度和高度:
.google-map {
width: 100%;
height: 400px;
}
最後一步,是在 mounted 階段建立一個地圖與一個地標:
export default {
name: "Restaurants",
data() {
return {
map: null,
// 預設經緯度在信義區附近
lat: 25.0325917,
lng: 121.5624999
};
},
mounted() {
this.initMap();
this.setMarker();
},
methods: {
// 建立地圖
initMap() {
// 透過 Map 物件建構子建立新地圖 map 物件實例,並將地圖呈現在 id 為 map 的元素中
this.map = new google.maps.Map(document.getElementById("map"), {
// 設定地圖的中心點經緯度位置
center: { lat: this.lat, lng: this.lng },
// 設定地圖縮放比例 0-20
zoom: 15,
// 限制使用者能縮放地圖的最大比例
maxZoom: 20,
// 限制使用者能縮放地圖的最小比例
minZoom: 3,
// 設定是否呈現右下角街景小人
streetViewControl: false,
// 設定是否讓使用者可以切換地圖樣式:一般、衛星圖等
mapTypeControl: false
});
},
// 建立地標
setMarker() {
// 建立一個新地標
const marker = new google.maps.Marker({
// 設定地標的座標
position: { lat: this.lat, lng: this.lng },
// 設定地標要放在哪一個地圖
map: this.map
});
}
}
};
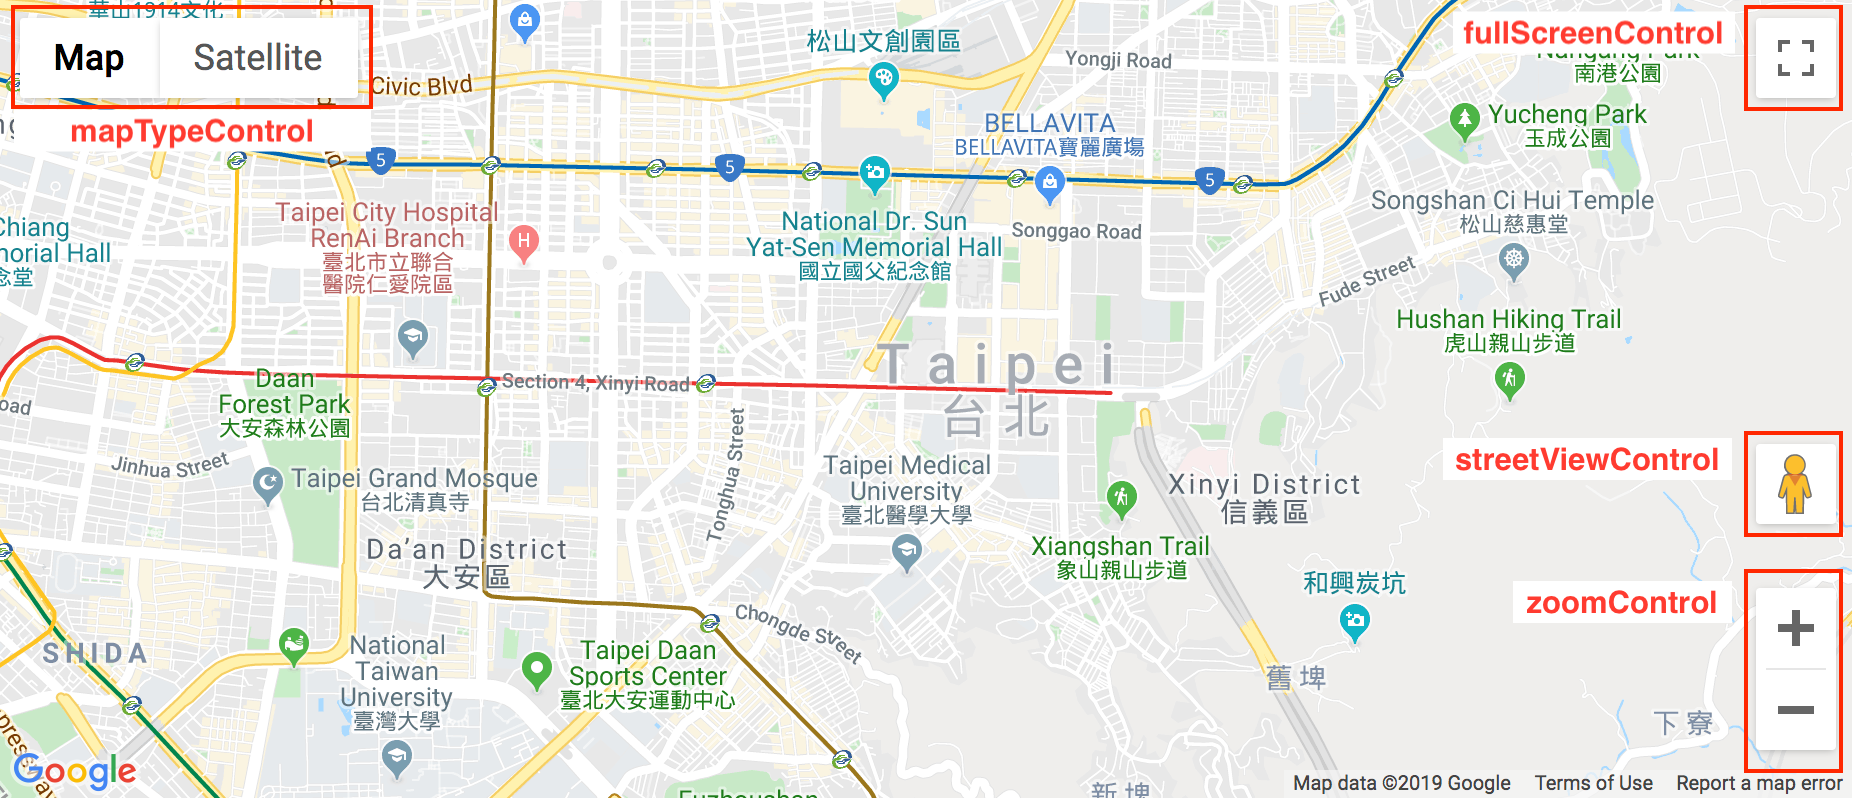
😃 Map Options 建立地圖時的設定
1. center: 設定地圖的中心點經緯度位置
2. zoom: 設定地圖縮放比例--0 能看到個地球的比例、20 能看到大樓的比例
3. streetViewControl: 設定是否呈現右下角街景小人,讓使用者能使用街景功能
4. mapTypeControl: 設定是否讓使用者可以切換地圖樣式:公路圖、衛星圖等
5. mapTypeControlOptions: 針對「切換地圖樣式」能有更多客製化設定,如樣式等
6. fullscreenControl: 設定是否讓使用者可以點擊開啟全螢幕地圖功能
7. zoomControl: 設定顯示縮放大小的控制鈕(地圖尺寸小於200x200px時預設消失)
8. ZoomControlOptions: 針對縮放大小按鈕有更多設定,如更改在地圖上的擺放位置 
Map Option 相關設定在地圖上的示意圖
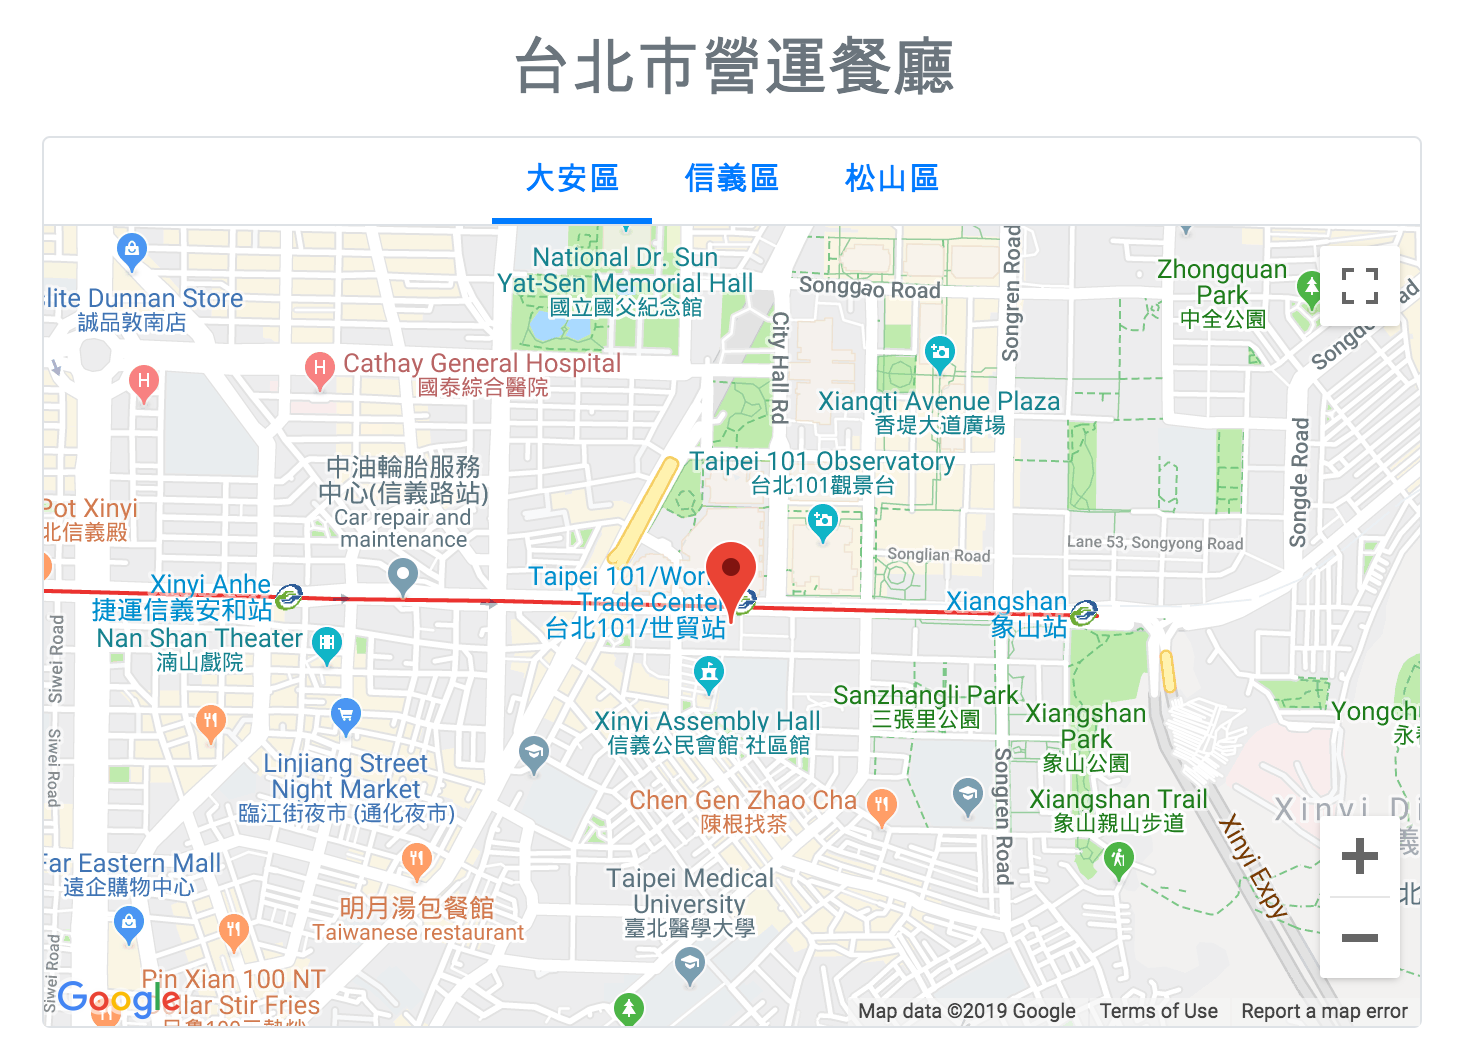
Voila! 一張簡單的地圖配上一個小地標就能呈現出來了:

顯示一個地圖與一個地標
😃 Marker 地標特效與客製化
1. animation 屬性: 設定地標特效--DROP 為從地圖上方墜落 / BOUNCE 會持續彈跳
2. icon 屬性: 設定使用客製化的地標圖示
3. draggable 屬性: 設定地標可以被使用者拖拉至他處顯示地標資訊
目前在地圖上只有單純顯示地標,如果想給予地標更多的資訊 — 例如在點擊地標後,使用者可以看到餐廳名稱 — 則可以使用 Info Windows 來實作:
export default {
name: "Restaurants",
data() {
return {
map: null,
lat: 25.0325917,
lng: 121.5624999
};
},
mounted() {
this.initMap();
this.setMarker();
},
methods: {
// 建立地圖
initMap() {
this.map = new google.maps.Map(document.getElementById("map"), {
center: { lat: this.lat, lng: this.lng },
zoom: 15,
maxZoom: 20,
minZoom: 3,
streetViewControl: false,
mapTypeControl: false
});
},
// 建立地標
setMarker() {
const marker = new google.maps.Marker({
position: { lat: this.lat, lng: this.lng },
map: this.map
});
// 透過 InfoWindow 物件建構子建立新訊息視窗
const infowindow = new google.maps.InfoWindow({
// 設定想要顯示的內容
content: `
好食餐廳
`,
// 設定訊息視窗最大寬度
maxWidth: 200
});
// 在地標上監聽點擊事件
marker.addListener("click", () => {
// 指定在哪個地圖和地標上開啟訊息視窗
infowindow.open(this.map, marker);
});
}
}
};
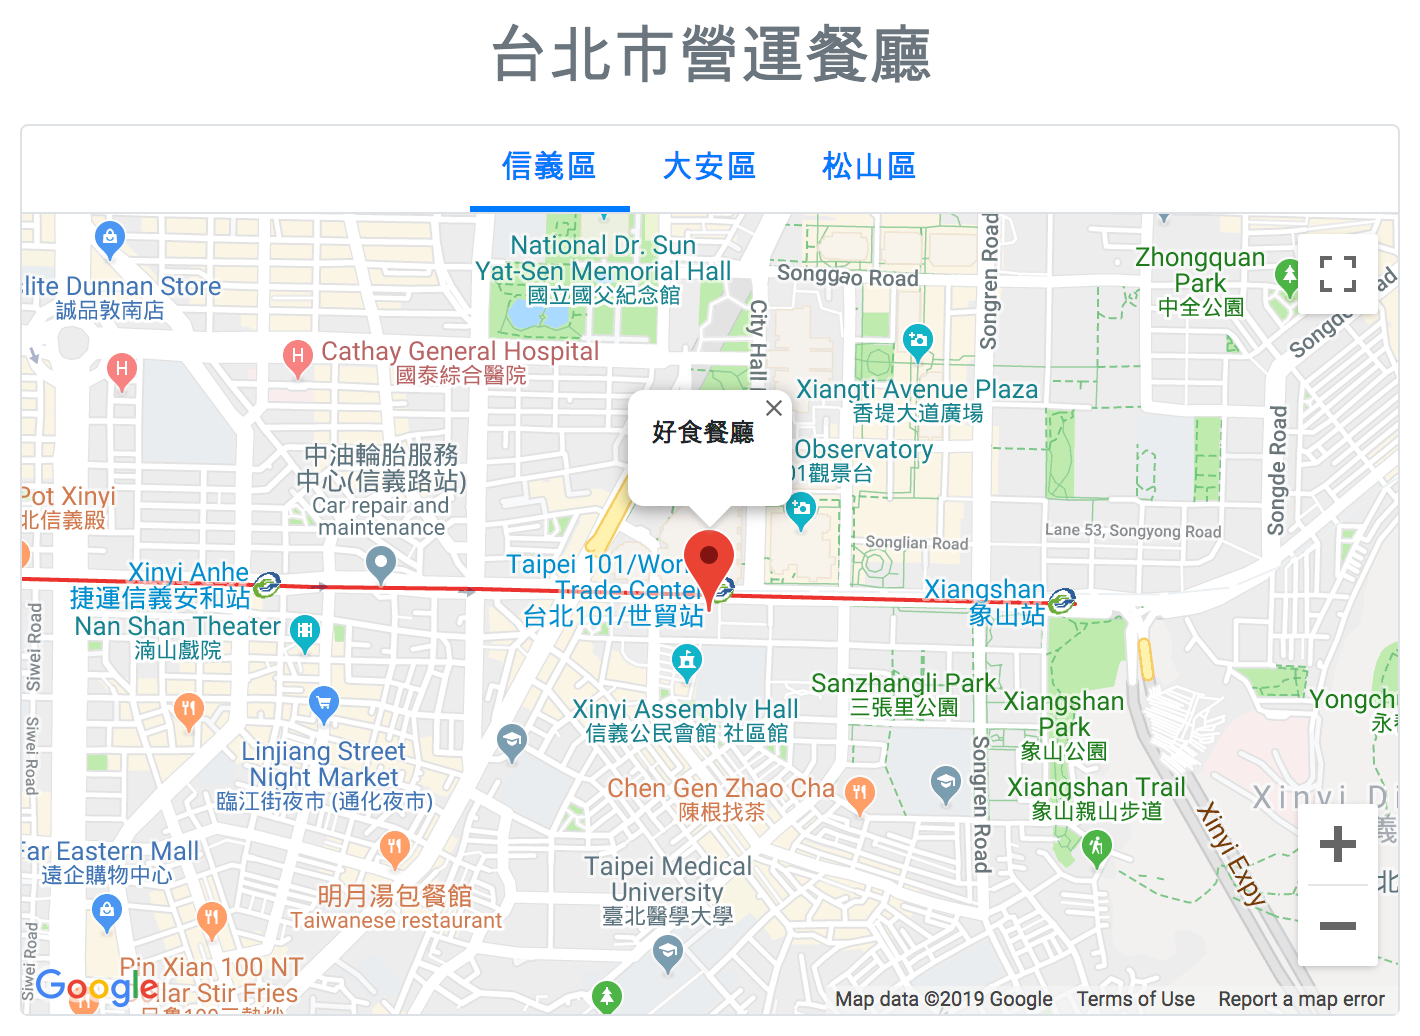
由於有在地標上綁定點擊事件的監聽器,因此現在只要點擊地標,就會觸發info window的 open() 方法,開啟餐廳資訊視窗:

置放多個地標
在地圖上也可以置放多個地標 — 例如想在地圖上標示出信義區有營運的好幾間餐廳。為了簡化向後端資料庫取得餐廳資訊,先暫時使用 Dummy Data:
建立 Dummy Data
建立一個 xinyi.json 的檔案,以 JSON 格式存放信義區預設的地圖中心點與四間信義區的餐廳名稱、ID、座標位置:
{
"center": {
"lat": 25.0325917,
"lng": 121.5624999
},
"restaurants": [
{
"id": 1,
"name": "餐廳一",
"lat": 25.0340,
"lng": 121.5645
},
{
"id": 2,
"name": "餐廳二",
"lat": 25.036643,
"lng": 121.567678
},
{
"id": 3,
"name": "餐廳三",
"lat": 25.033643,
"lng": 121.566678
},
{
"id": 4,
"name": "餐廳四",
"lat": 25.031569,
"lng": 121.568579
}
]
}使用 Dummy Data 在地圖上建立四個地標
- 首先在 Restaurants.vue 中載入剛建立好的 xinyi.json 檔案,並在 mounted() 階段透過 fetchRestaurants() 取得並更新餐廳與中心點座標
- 在 setMarker() 中透過迴圈,在地圖上為四間餐廳分別建立地標與訊息視窗,且在地標加上事件監聽器,在監聽到點擊事件時,開啟訊息視窗:
// 引入餐廳 Dummy data
import dummyRestaurants from "../dummy_data/xinyi.json";
export default {
name: "Restaurants",
data() {
return {
map: null,
lat: 25.0325917,
lng: 121.5624999,
restaurants: []
};
},
mounted() {
this.initMap();
// 取得餐廳假資料
this.fetchRestaurants();
// 使用餐廳假資料建立地標
this.setMarker();
},
methods: {
fetchRestaurants() {
this.restaurants = dummyRestaurants.restaurants;
this.lat = dummyRestaurants.center.lat;
this.lng = dummyRestaurants.center.lng;
},
initMap() {
this.map = new google.maps.Map(document.getElementById("map"), {
center: { lat: this.lat, lng: this.lng },
zoom: 15,
maxZoom: 20,
minZoom: 3,
streetViewControl: false,
mapTypeControl: false
});
},
setMarker() {
// 為每間餐廳都建立地標、訊息視窗、事件監聽
this.restaurants.forEach(location => {
const marker = new google.maps.Marker({
// 設定為該餐廳的座標
position: { lat: location.lat, lng: location.lng },
map: this.map
});
// 建立訊息視窗
const infowindow = new google.maps.InfoWindow({
content: `
${location.name}
`,
maxWidth: 200
});
// 綁定點擊事件監聽
marker.addListener("click", () => {
infowindow.open(this.map, marker);
});
});
}
}
};
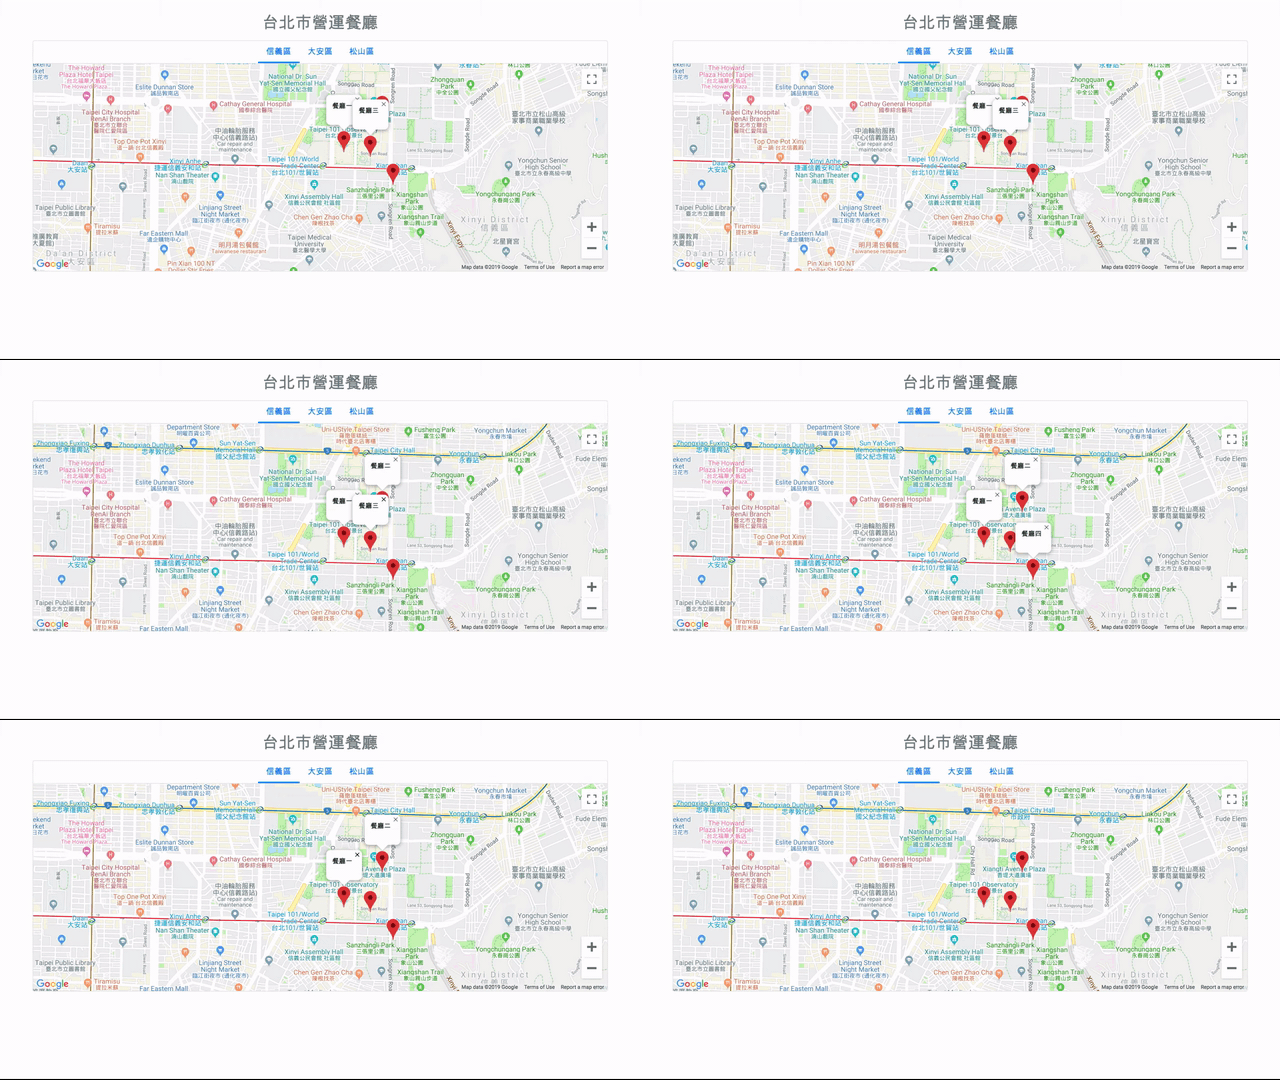
接著就能在地圖上看到多個地標和效果:

一次只顯示一個地標資訊視窗
訊息視窗透過 open() 方法開啟後,將持續保持開啟狀態,直到使用者點擊關閉的圖示。若希望一次只能開啟一個訊息視窗 — 也就是當點擊第二的地標時,會先將第一個地標的訊息視窗將關閉,才開啟第二個視窗 — 則可以透過 Info Windows 的 close() 方法,指定關閉視窗:
// 引入餐廳 Dummy data
import dummyRestaurants from "../dummy_data/xinyi.json";
export default {
name: "Restaurants",
data() {
return {
map: null,
lat: 25.0325917,
lng: 121.5624999,
restaurants: [],
// 存放目前開啟的訊息視窗
infowindow: null
};
},
mounted() {
this.initMap();
// 取得餐廳假資料
this.fetchRestaurants();
// 使用餐廳假資料建立地標
this.setMarker();
},
methods: {
fetchRestaurants() {
this.restaurants = dummyRestaurants.restaurants;
this.lat = dummyRestaurants.center.lat;
this.lng = dummyRestaurants.center.lng;
},
initMap() {
this.map = new google.maps.Map(document.getElementById("map"), {
center: { lat: this.lat, lng: this.lng },
zoom: 15,
maxZoom: 20,
minZoom: 3,
streetViewControl: false,
mapTypeControl: false
});
},
setMarker() {
// 為每間餐廳都建立地標、訊息視窗、事件監聽
this.restaurants.forEach(location => {
const marker = new google.maps.Marker({
// 設定為該餐廳的座標
position: { lat: location.lat, lng: location.lng },
map: this.map
});
// 建立訊息視窗
const infowindow = new google.maps.InfoWindow({
content: `
${location.name}
`,
maxWidth: 200
});
// 綁定點擊事件監聽
marker.addListener("click", () => {
// 如果目前有開啟中的訊息視窗,先將其關閉
if (this.infowindow) this.infowindow.close();
// 顯示被點擊地標的訊息視窗
infowindow.open(this.map, marker);
// 存入目前開啟的訊息視窗
this.infowindow = infowindow;
});
});
}
}
};
切換地區功能
專案中有三個營運地區,目標是在點擊某一地區後,顯示該地區的營運餐廳。在 Restaurants.vue 的 中,導覽列裡包含了三個地區,點擊連結後,透過 query string 帶入選擇地區的資料:信義區 xinyi、大安區 daan、松山區 songshan
台北市營運餐廳
- 信義區
- 大安區
- 松山區
依照選擇的地區更新地圖資訊
- 透過 beforeRouteUpdate() ,根據路由的 query string 辨別使用者所點擊的地區,取得相對應的假資料 — 包含該地區的預設中心點及四間營運中的餐廳資料
- 建立 resetCenter() 方法,設定地圖新的中心點:透過 google.maps.Map 的 panTo() 方法重新給予地圖中心(相對於 setCenter() 方法,panTo() 讓地圖在移動時會有滑順的*移動效果)
- 在 setMarker() 方法中,先呼叫 deleteMarkers() 方法,將舊的地標刪除後,才建立新地標
- deleteMarkers() 方法:使用 marker 的 setMap() 方法,並帶入參數 null 移除地標,同時需要清空存有地標的 markers 陣列
// 載入三個地區的假資料
import xinyiDummyRestaurants from "../dummy_data/xinyi.json";
import daanDummyRestaurants from "../dummy_data/daan.json";
import songshanDummyRestaurants from "../dummy_data/songshan.json";
export default {
  name: "Restaurants",
  data() {
    return {
      map: null,
      lat: 25.0325917,
      lng: 121.5624999,
      infowindow: null,
      // 存放已建立的地標
      markers: [],
      // 存放餐廳資料
      restaurants: []
    };
  },
  mounted() {
    // 透過 query 確認要瀏覽的地區為何
    const { district } = this.$route.query;
    this.fetchRestaurants(district);
    this.initMap();
    this.setMarker();
  },
  beforeRouteUpdate(to, from, next) {
    const { district } = to.query;
    // 取得餐廳假資料
    this.fetchRestaurants(district);
    // 設定新的地圖中心
    this.resetCenter();
    this.setMarker();
    next();
  },
  methods: {
    fetchRestaurants(district = "xinyi") {
      let dummyData = {};
      // 依照所選擇的地區使用對應的 dummy data
      if (district === "daan") {
        dummyData = daanDummyRestaurants;
      } else if (district === "xinyi") {
        dummyData = xinyiDummyRestaurants;
      } else {
        dummyData = songshanDummyRestaurants;
      }
      this.restaurants = dummyData.restaurants;
      this.lat = dummyData.center.lat;
      this.lng = dummyData.center.lng;
    },
    initMap() {
      this.map = new google.maps.Map(document.getElementById("map"), {
        center: { lat: this.lat, lng: this.lng },
        zoom: 14,
        maxZoom: 20,
        minZoom: 3,
        streetViewControl: false,
        mapTypeControl: false
      });
    },
    // 重設地圖中心點
    resetCenter() {
      // set center
      this.map.panTo({ lat: this.lat, lng: this.lng });
    },
    // 清除所有地標
    deleteMarkers() {
      this.markers.forEach(marker => marker.setMap(null));
      this.markers = [];
    },
    setMarker() {
      // 將已存在的地標都先刪除
      this.deleteMarkers();
      this.restaurants.forEach(location => {
        const marker = new google.maps.Marker({
          position: { lat: location.lat, lng: location.lng },
          map: this.map
        });
        // 將新建立的地標存起來
        this.markers.push(marker);
        const infowindow = new google.maps.InfoWindow({
          content: `


${location.name}


        `,
          maxWidth: 200
        });
        marker.addListener("click", () => {
          if (this.infowindow) this.infowindow.close();
          infowindow.open(this.map, marker);
          this.infowindow = infowindow;
        });
      });
    }
  }
};
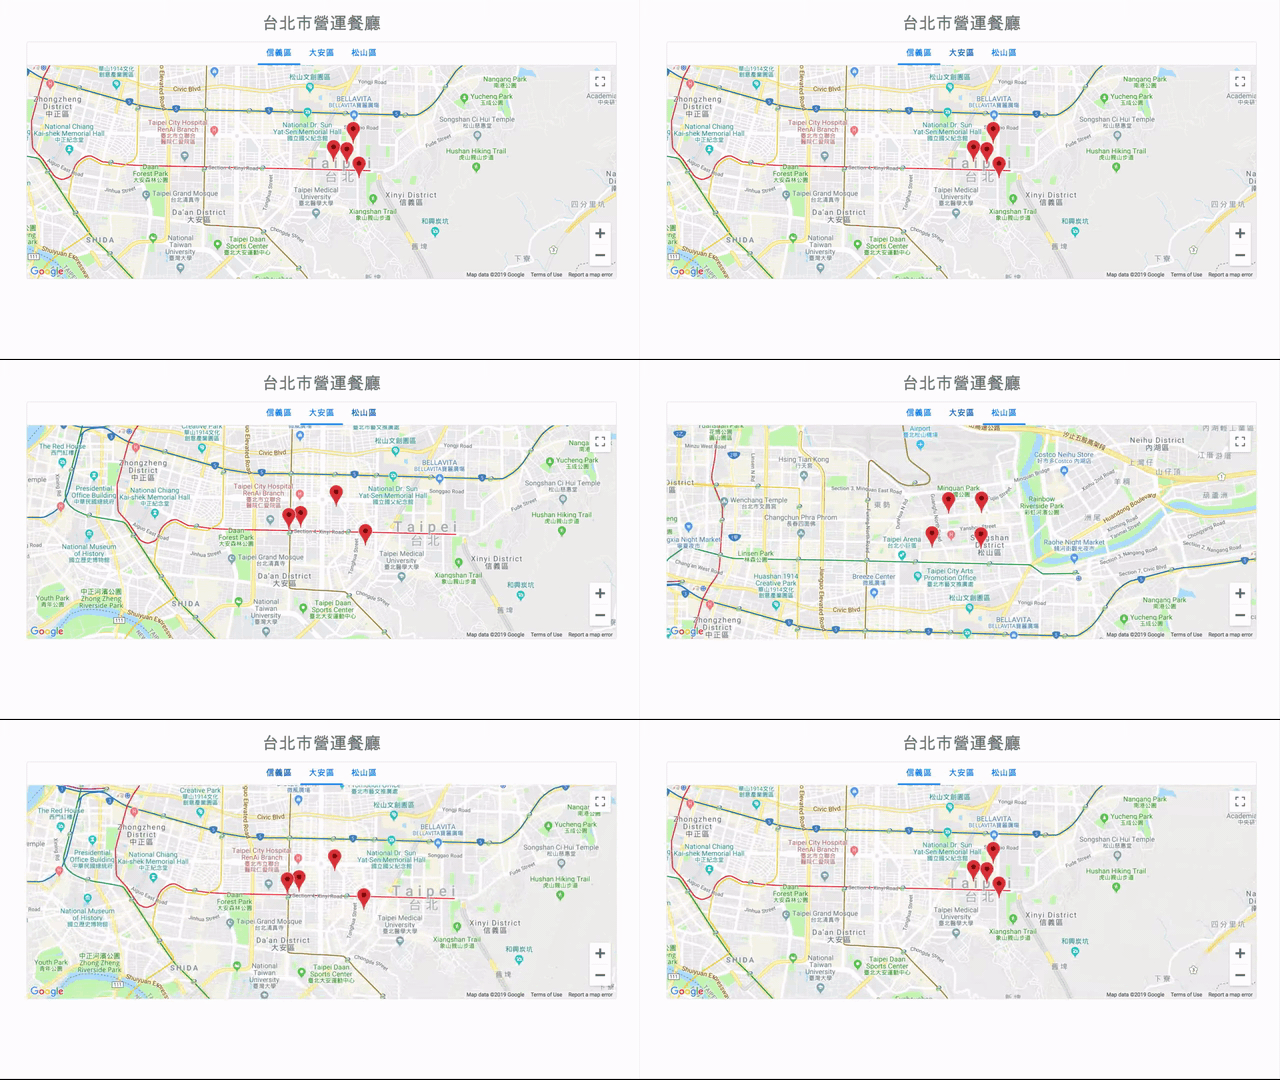
❗️ PanTo 滑順移動效果限制 透過 PanTo 更新地圖中心點時,只有當移動距離小於地圖的長度與寬度時,才會有該效果完成後,點擊不同地區就會顯示該地區營運中的餐廳:
獨立成可重複使用的 Component
為了方變展示,在此之前是將整個地圖的產生一併寫在 Restaurants.vue 檔案中,但未來在專案裡,也會有其他時機可能需要使用這個功能 — 例如在訂餐明細中,將該預定餐廳顯示在地圖上,方便使用者辨別餐廳位置 — 因此接下來簡單將地圖產生獨立成一個 Component,供未來重複使用:
預期結果
- 獨立地圖產生功能為一個 Component:GMap.vue
- 未來在需要的頁面將 Component 引入並帶入相關設定即可使用
建立 GMap.vue Component
在 components 資料夾中建立一個名為 GMap.vue 的檔案,將相關的地圖設定從 Restaurants.vue 抽出放到這個檔案中,並稍做修改與編輯:
export default {
  // 接收來自父元件的地圖設定資訊
  props: {
    center: {
      type: Object,
      default: () => ({ lat: 25.0325917, lng: 121.5624999 })
    },
    zoom: {
      type: Number,
      default: 14
    },
    streetViewControl: {
      type: Boolean,
      default: true
    },
    mapTypeControl: {
      type: Boolean,
      default: true
    },
    fullscreenControl: {
      type: Boolean,
      default: true
    },
    zoomControl: {
      type: Boolean,
      default: true
    },
    restaurants: {
      type: Array,
      default: () => []
    }
  },
  data() {
    return {
      map: null,
      infowindow: null,
      markers: []
    };
  },
  // 當發現中心位置改變時,更新中心位置與地標
  watch: {
    center(val) {
      this.resetCenter();
      this.setMarker();
    }
  },
  mounted() {
    this.initMap();
    this.setMarker();
  },
  methods: {
    initMap() {
      this.map = new google.maps.Map(document.getElementById("map"), {
        center: this.center,
        zoom: this.zoom,
        maxZoom: 20,
        minZoom: 3,
        streetViewControl: this.streetViewControl,
        mapTypeControl: this.mapTypeControl,
        fullscreenControl: this.fullscreenControl,
        zoomControl: this.zoomControl
      });
    },
    resetCenter() {
      // set center
      this.map.panTo({ lat: this.center.lat, lng: this.center.lng });
    },
    clearMarkers() {
      this.markers.forEach(marker => marker.setMap(null));
      this.markers = [];
    },
    setMarker() {
      // clear existing markers
      this.clearMarkers();
      this.restaurants.forEach(location => {
        const marker = new google.maps.Marker({
          position: { lat: location.lat, lng: location.lng },
          map: this.map
        });
        // save markers
        this.markers.push(marker);
        const infowindow = new google.maps.InfoWindow({
          content: `


${location.name}


        `,
          maxWidth: 200
        });
        marker.addListener("click", () => {
          if (this.infowindow) this.infowindow.close();
          infowindow.open(this.map, marker);
          this.infowindow = infowindow;
        });
      });
    }
  }
};
在 Restaurants.vue 中使用
接著,只需要在 Restaurants.vue 中載入 GMap.vue 元件,將相關的地圖設定資訊與需要呈現的餐廳資料帶入即可 — 未來其他頁面如果需要使用到地圖時,也可以用相同的方法:
台北市營運餐廳
// 載入 GMap Component
import GMap from "../components/GMap";
export default {
  components: {
    GMap
  },
  data() {
    return {
      lat: 25.0325917,
      lng: 121.5624999,
      restaurants: []
    };
  },
  // 其他程式碼
};


.google-map {
  width: 100%;
  height: 400px;
}
/*其他樣式設定*/
結語
之前曾經把玩過 Google Extension 並記錄在「[筆記] 從零開始製作 Chrome 套件到上架商店」這篇文章中,這次很開心又有機會接觸 Google 的其他服務!在接觸 Google Map API 以前的確感覺到在使用上是有一個門檻在的 — 無論是對於價錢和技術運用,都有一些想像。然而就跟之前在學習 Google Extension 一樣,經過閱讀官方文件和教學,甚至開始實作後,就會慢慢ㄌ了解操作上的脈絡,以及使用上的樂趣。Gogle Map API 還有許多其他服務可以把玩,已經等不及在未來能有更多的體驗了!
專案資料夾
https://github.com/smallpaes/google-map-api-practice-map?source=post_page-----8eed860637d6----------------------
好文轉自作者Mike Huang–[筆記] 從零接觸 Google Map API:在 Vue.js 中實作地圖、地標、訊息視窗
如果你喜歡他的文章,歡迎回到他的Medium【麥克的半路出家筆記】看更多。如果你想要知道更多關於Vue.js課程,快樂學程式也推出了實作專案在此:

如果你的入門還在單打獨鬥,歡迎來到快樂學程式找到志同道合的夥伴,你的自學之路不孤單。
![[筆記] 從零接觸 Google Map API 1:在 Vue.js 中實作地圖、地標、訊息視窗](https://s3-ap-southeast-1.amazonaws.com/admin.firelab.cc/wp-content/uploads/sites/3/2019/12/10121615/googlemapAPI%E5%B0%81%E9%9D%A2.jpg)
